Showing posts with label DIY. Show all posts

Monday, July 8, 2013

Bathroom is Done!

Aside from some small tweaks but you know how that is. A person who is obsessed with interiors is never truly "done"

We started this demo in January of 2012. You read that right. There were hurdles, money, demanding schedules, lack of motivation, pole dancing to be done. But it is finished!


This is a bad before picture but this was it when we bought the place. 

We removed the wallpaper, repainted everything and lived with it like this for a few years.


Our master bath was in bad shape so we focused on that first.

But now...


I still want to add some open shelves with baskets and pretty towels above the toilet but everything else is done-zo! Fur-downs gone, pony wall gone, new tile and paint, new lighting.

Bone inlay mirror is from Wisteria, no longer available :(

New cultured marble countertops, under mount sink (these are the only way to go, in my humble opinion)


my painting moved in here


Vintage glass towel bar, hung some art, with one lonesome decor piece on the counter :)


Vintage persian purchased on craigslist. Marble tile in herringbone pattern.


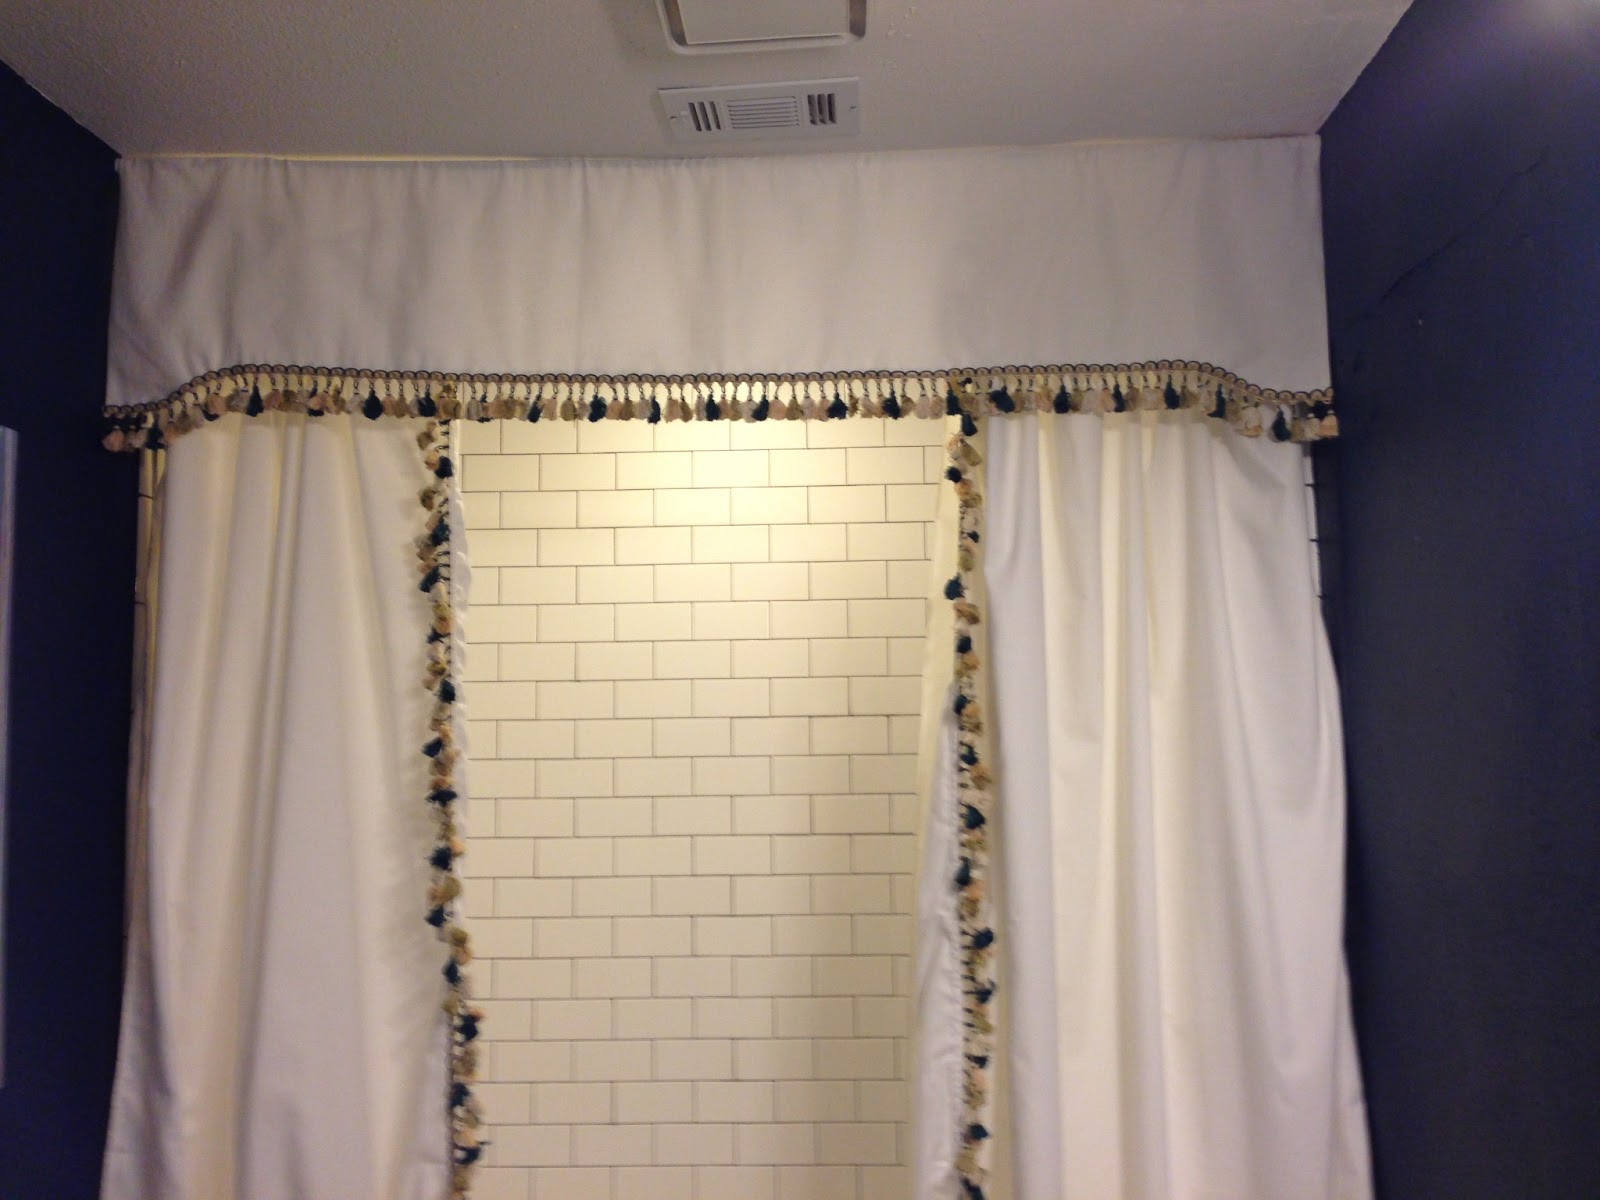
Subway tile with dark grout. My mom and I sewed the curtains. It's an ivory linen with tassel trim. The fur-downs extended over the shower and that is now gone as well. The whole room just feels bigger without those silly and completely unnecessary things. I don't understand why they were ever popular!

In other news, scott surprised me with this table from Target last week! Have you seen their new Threshold line? Of course you have, don't be silly. You know how I love rocks and agates. This was only $60!


All styled up!

Have a great week!

Photobucket

Friday, May 31, 2013

My New Craigslist Purchase + Updated Living Room

I'm not even going to mention how long it's been since I've posted, so let's just forgive and forget ok?

Great!

I really wanted to buy a chaise for our living room to solve our lack of seating dilemma. 


I emailed and emailed again and no answer. Something in the air lately has been making all the people I contact via craigslist completely ignore me. So rude!

So I had to move on.

Luckily I found this guy...


Ignore the weights on the mantle. If you follow me on instagram you know I'm getting swole with p90x, #bringit.

Anyways, it was perfect and a great price, and we took it home hanging out of the trunk of my husband's civic. I'd like to reupholster it in some type of velvet at some point but it's really not bad as is.

You can also see our new mirror above the mantle there. It's so sparkly! I'm thinking about painting the brick soon too. You know, with all my spare time.


My prized chinese screen has relocated to here and I re configured the art wall. I like it much better like this and I can't wait to fill it even more.


I still need to zhush the rug placement a bit but its taped down so easier said than done.

I'm happy to say our living room is finally in a place I'm completely and utterly happy with. I just have this feeling of "ahh" when I walk in the room.

Is it finished? no. Will it ever be? no! But tweaking and changing things is the fun part! Our spaces evolve with us, and that's what I love about design. 


A little detail shot. Sorry about blurry pics, my DSLR has bit the dust and my iphone is all I have!

Our spare bathroom is also now 90% complete, just a few tweaks and installing the pretty things is left. Can't wait to show you, I'm in love!

Have a great weekend lovers!
Photobucket

Monday, March 18, 2013

New DIY Upholstered Headboard

Hello friends!

Wow, life is busy! I'll spare you all my excuses about my absence so let's just get straight to the pretty.

New Headboards!

And tons of pattern!


You may recall the headboard I built forever ago. I covered it with a kantha cloth, which I loved, but I knew it wasn't forever. I had admired this crewel work fabric for a long time and finally decided to order it.

Then I waited...and waited...and waited more. It took over 6 months to come! And for that reason I won't link you to the website. They are full of lies and I wouldn't wish that on anyone. Good thing this was for me and not a client. Could you imagine?!


Pillows are sewn by me. The blue fabric is hand blocked brought by my father in law back from Indonesia.


Atari approves of his napping digs.


Sources:

Gray Linen Bedding: CB2
Sheets: Ikea
Pink Lamps: Target
Rug, Kantha Cloth, Tufted Bench: Wisteria
Curtains: JcPenney with trim I sewed on
Nightstand, Vanity, Accessories, Art: All vintage

So what do you guys think? I'm just loving the way all the color and pattern mixes together. It's not something I planned or even think can be planned. It has to be layered and collected over time. Not good for those of us who like instant gratification but so satisfying in the end!

Next I would like to replace the lamps, I think emerald green needs to go in here like I need dark chocolate (which is really bad!)

Happy Monday lovers!

Photobucket

Monday, August 6, 2012

Brass Sculpture DIY


I'm sure many of us have admired this brass sculpture many a time...


But even the smallest one is $1600! Woah nelly!

I really NEEDED one though...

In comes the DIY. This is going to be another tale of DIY gone wrong at the beginning.


I used small wood sticks and cut them in half using clippers. You can opt not to cut yours if you want a bigger sculpture.

Buy a small GREEN floral foam ball.

This is very important. I first tried with a larger ball which, duh, looked stupid. Then I tried with a small white ball which was way too hard to stick the sticks into.

The I got the small green ones and cut them in half.

Spray paint then start at the top sticking the sticks in like so.


You don't really need to get too hung up on spacing them out perfectly, which my OCD side was totally wanting to do.

After you stick them all in take it outside for a few coats of gold spray paint.


And voila! Nice little sculpture. I would love to make some more for a nice little wall arrangement.

Overall it's a pretty easy DIY. Have you done any lately?


Photobucket

Tuesday, May 29, 2012

DIY Trials and Tribulations

As most of us DIY homies know, doing it yourself sometimes means doing it (shittily) yourself, or sometimes scrapping the whole thing and starting over.

This is one of those times.

When I bought our amazing craigslist coffee table I knew I wanted to build a box wrapped in brass to make it taller. A lot of you said I should just leave it but we eat dinner at ours a lot so we need something taller.


We started with a box my husband built in the appropriate dimensions. I spray painted it with a gold paint that was supposed to look like plated metal. It didn't. Then I bought a roll of sheet metal from the craft store.


We covered the box in ultra strong carpet tape and cut the metal with an x-acto knife.


We ruined about half of the sheet trying to figure out the right method. Then we got it right and got one side covered pretty well.


The problem is since the metal came in a roll it doesn't look flat. Being rolled up created little bumpys which are hard to see in this photo but it real life it's less than ideal.

So its back to the drawing board again.


I got some shiny gold wrapping paper we are going to try.

Have you had any DIY trials and tribulations lately?

Please tell me I'm not alone.

P.S. I got sooooo much done over the three day weekend. Its amazing what one extra day off can do. I will have a few quick changes to share with you this week. Hooray!

Photobucket

Tuesday, April 19, 2011

Organize Your Jewelry: DIY style

My little homemade jewelry holders got me thinking last week about all the little ways you can organize your jewelry.


These little holders were so easy to make. Check out your local hardware store for wood trim. Then paint as desired. Screw a few cup hooks in, you will most likely need to drimmel the back of the screw off as my trim wasn't thick enough, easy fix though. Then I attached some of those 3M poster strips to the back and ta da!

There's so many other creative ways that would be easy for any novice DIYer to recreate.


How awesome is this?! And so easy I'm peeved I hadn't thought of it already! It's hard to tell but I think there are little hooks or nails all along the branches. I bet most of you have a frame laying around just begging for this!


Here is a similar idea to the one above. Here I like how it seems like they have string across the top frame to hold earrings. I never know how to organize all my earrings!


Or you can use one of those fantastic printer drawers you see at flea markets. Screw in a bunch of hooks and you have an amazing display!

How do you have your jewelry organized?


Photobucket