Showing posts with label Spending Time in the Kitchen. Show all posts

Thursday, December 22, 2011

Pinterest Duel Updates

We had our party last weekend, which was totally fun. Nothing got broken even though copious amounts of wine was consumed. Although I did knock over a small plant when I was "Paul Abdul-ing" in the breakfast nook...only a little dirt spilled though.

The party gave me an excellent opportunity to make a few more things from my recipe boards and get me further on my way to achieving my goal.

First up: The Appetizers


This came out awesome. I specifically looked for a recipe that used balsamic vinegar because I just love the flavor. I made it early in the morning so it would have plenty of time to soak up the flavor before the party, which I highly recommend doing.

It made quite a bit of topping. Everyone liked it so much that we ran out of bread and I had to send Scott to the store to get more. Some of which was promptly put in the toaster and forgotten about by the drunkards. They ate ALL of it!


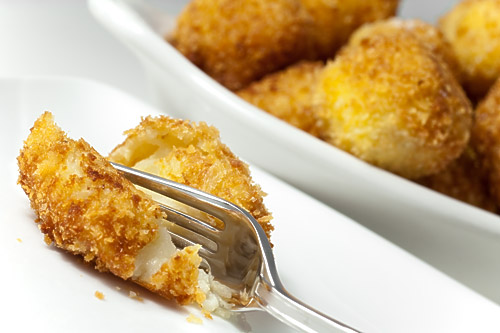
I'm posting this again because, being my second time making it, I have a few more tips. I made it a bit spicier this time around, which I preferred. I also sliced it a lot thinner to make smaller bites. I thought it would make them more of a finger food, I could either way on this. I did not make nearly enough though. It was gone in a mere half hour and late guests didn't get a chance to try them. Perhaps double up if you are making this for a group because people love them!

Now for Desserts!


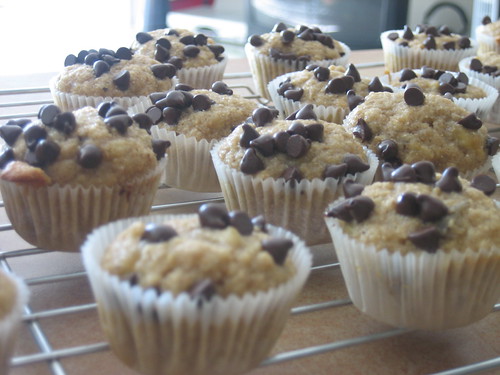
I'll admit, I used a box mix to make the cupcake pat of it. I didn't have a lot of time and making a chocolate cupcake from scratch is nothing new for me. I was more interesting in the peppermint frosting. Which came out amazing! I didn't do the fancy red stripe because I don't pipe my cupcakes. There was a lot of extra frosting. So if you make this you might want to have a game plan of what to do with the extra! Super easy to make and delicious.


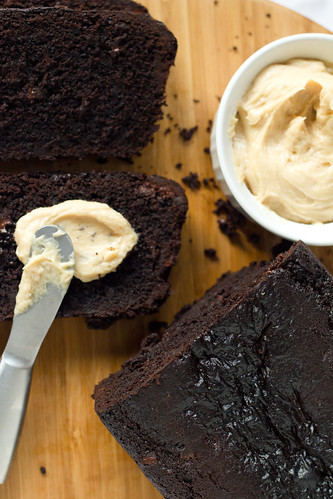
I definitely had a theme to my desserts! This was also easy to make. You spread the chocolate layer on after its been in the freezer. This made the chocolate cool a bit too quickly to be spread around properly. If I made it again I might let it warm up before putting that layer on.

I didn't use a cookie cutter to cut mine but just sliced it with a knife instead. When I sliced it the chocolate layer on top crumbled a bit and broke apart. I might use a cookie cutter next time so if it might remedy that problem. They still tasted great!

So that is 11 out of 35 things made. I'm almost a third of the way there! I plan to make a few more dinner things over my break next week.

Have you brought anything on your pinterest boards to life lately?

Photobucket

Tuesday, December 13, 2011

Pinterest: I Challenge you to a Duel!

This is sort of like the Pinterest Challenge that Young House Love did a while back but a little different. I'm taking on two of my 18 pin boards and I thought i would share it with you (mostly to hold myself accountable) and invite you to join.

The Duel

To make everything on my board about desserts and everything on my board about other foods.

That's a total of 35 items!

I know, I'm stoopid.

This is sort of an unofficial challenge to myself and there are no deadlines to complete this, so it's not very stressful. Stress is not the goal here people! I gave myself this challenge before thanksgiving. This is the perfect time of year to do something like this too. So many parties, potlucks, shindigs and hootenannies to attend.

So here's how its going:

I have made a total of 8 things. Not too bad!

First up, desserts.


Double chocolate loaf with Peanut Butter Cream Cheese Spread

This. is. retarded. good.

I've made it twice now and both times it has surprised and delighted guests. The directions say to bake for an hour but I only needed about 40 minutes. Not sure if I used a bigger pan or my oven is just shitty so if you make this keep an eye on it. It's pretty easy to make too and not too messy.


Another super easy one. I took this to a game night and everyone loved it. It's made with golden grahams cereal, no baking and stayed fresh for a few days aka just long enough for me to eat too many and get sick of them.


So  many favorite things in one muffin. I didn't make the spread to go on top. I just didn't feel it needed it. I also added dark chocolate chips to mine. It DID need that, at least I thought it did ;)


This was my dish for thanksgiving. They turned out awesome. I didn't read the directions very well and put the cream cheese mixture in the fridge instead of the freezer, oops. It was fine, i just had to scoop it out with a spoon as opposed to slicing off a nice frozen circle to put in the center. Otherwise, a great recipe. These are really sweet so I think they're more of a dessert than a breakfast item, which can be interchangeable if you ask me!

Now for the entrees and apps:


Ok these were good. But they were really hard to make and time consuming and they didn't look pretty. So I probably won't be making them again. There were a lot of steps and it was really messy. One of the steps is to, duh, make the mashed potato mixture into balls. Well, it's fucking mashed potatoes so it's totally not going to form into a nice little ball in your hand. They ended up being more like mashed potato splats but they still tasted good.


Jalapeno Cream Cheese Poppers

These are so so easy to make. If you need something quick to bring to a party, this is it. They are very tasty and you can make them ahead of time and just bake the day of. Can't get any easier. And only needs a few ingredients.


Spaghetti Casserole

This is probably one of the favorite things I've made (non dessert, of course). I substituted the beef for fake meat crumbles, which took out a cooking step. It's very spicy, which can be adjusted to taste. I seriously ate this for lunch and dinner for three days, it reheats well and I didn't get sick of it. The french onion is perfection.


Gluten Free Mexican Casserole

I made this for a lunch celebration for a co-worker who is gluten free. I enjoyed it but my husband did not. The main ingredient in it is cabbage, a flavor that is not for everyone. There's a tomato mixture as one of the layers, I didn't feel there was enough of it so if I made this again I might double that. This recipe was a bit time consuming, there is a lot of chopping, simmering on the stove, and then baking. It took a bit too long for my taste. Also, because of the layer of corn chips on top, it didn't reheat very well which was a shame.

So that's all I've made so far. I will be making several more things for our party this weekend. The only problem with this challenge is that I keep finding more things to add to the boards, and that's ok.

Do you have a board challenge you would like to do? Perhaps a DIY board or a recipe board of your own. Join me!

See all my boards here.


Photobucket

Friday, April 22, 2011

Spending Time in the Kitchen: Cookies N Cream Hot Fudge Oreo Brownies

Sounds ridic right? That's only because they are. On a side note, I think I've gained some weight!

These brownies are so easy. So I want to see even you novice bakers giving it the good ol college try. It's just a box mix of brownies with a few tweaks thrown in. This is sure to delight and impress your Easter guests!


Cookies N Cream Hot Fudge Oreo Brownies


Ingredients
1 Box of brownie mix + ingredients specified on the box
1 Heaping half cup Cookies N Cream Ice Cream
1/4 cup Hot Fudge (I used dark chocolate of course
1 Pack Oreos

1. Mix together your brownie as directed on the box but do not add the water
2. Add in hot fudge and ice cream and stir together until good and blended
3. Pour half the mixture into your desired sized pan
4. Layer Oreos on top then add the remaining batter. You want the oreos tight together to make a complete layer. Then the rest of the batter will cover to make the top layer.
5. Bake as directed on the box

Enjoy!

What are your holiday plans?

Photobucket

Monday, March 28, 2011

Spending Time in the Kitchen: Espresso Banana Chocolate Chip Muffins

Don't we all need a little pick me up on a Monday? What better to do that with than espresso, chocolate and banana?! These muffins are quite delicious and surprisingly easy to make.


                                                                           Source: kitchenisms.com via Alexis on Pinterest


                                                                              Source: kitchenisms.com via Luisa on Pinterest


I'm really feeling these colorful and cozy kitchens today, aren't you?

Now onto the good stuff...


One Bite Banana Whole Wheat Oat Flour Chocolate Chip Muffin


1 1/2 cups mashed, very ripe bananas (about 4)
1/2 cup sugar
1/4 cup firmly packed light brown sugar
1/2 cup (1 stick) unsalted butter, melted
1/4 cup whole milk
1 large egg
1 1/2 cups all-purpose flour
1 teaspoon instant espresso powder
1 1/2 teaspoons baking soda
1 teaspoon salt
1 cup (6 ounces) semisweet chocolate chips 
Preheat the oven to 350 degrees F. Spray a 12-cup muffin pan with nonstick cooking spray. In a medium bowl, stir together the bananas, sugars, butter, milk, and egg. In another medium bowl, whisk together the flour, instant espresso powder, baking soda and salt. Make a well in the middle of the dry ingredients. Pour the wet ingredients into the well and stir just until combined. Fold in the chocolate chips.
Fill each cup about 3/4 full. Bake in the center of the oven for 20-25 minutes, until a toothpick inserted in the center of the muffin comes out clean. 
Tips: I used dark chocolate chunks for mine. You all know I'm a fan of dark chocolate and the chunks instead of chips made them very decadent. Make sure the bananas you use are ripe as in probably just past the time you'd  normally eat them, you want them soft. I used 4 bananas in a food processor to mash them and it was way too many. Luckily I had some vanilla ice cream on hand which meant, banana milkshakes OH YEAH!
Enjoy!


Photobucket

Friday, December 24, 2010

Spending Time in the Kitchen: Oreo Truffles

Next up in the series of "ways to stuff your face"! These oreo truffles are another crowd pleaser. They are rich and delicious and no one will know how easy they actually are to make! Recipe at the bottom!


Oreo Truffle Recipe

Ingredients:

  • 1 package of Oreo Cookies
  • 8 ounces cream cheese, room temperature
  • 1 lb white chocolate
  • 1/2 lb milk chocolate
Directions:
  1. Using a food processor, grind cookies to a fine powder. Then blend cookie powder and cream cheese until thoroughly mixed (there should be no white traces of cream cheese).  
  2. Roll into small balls and place on wax-lined cookie sheet. Refrigerate for 45 minutes to an hour.
  3. Line two cookie sheets with wax paper. Melt white chocolate. Dip balls and coat thoroughly. With slotted spoon, lift balls out of chocolate and let excess chocolate drip off. Place on wax-paper-lined cookie sheet.
  4. Separately, melt milk chocolate. Drizzle milk chocolate over balls. Let cool.
  5. Store in airtight container, in refrigerator. 

Here's a little pic of these scrumptious treats!


Merry Christmas and Happy Holidays every one!

Tuesday, December 14, 2010

Spending Time in the Kitchen: Peanut Butter Patties

If your life is anything like mine you've been spending a lot of time in the kitchen lately. Something, you may not know about me is I LOVE to make desserts. My husband usually makes the food but I am the sweet treat connoisseur! I make some type of dessert at least once a week, usually it's part of my sunday routine.

Since the time is appropriate I thought it would be nice to share some of my favorite recipes with you. And if you're lucky enough to have a kitchen as gorgeous as these you may not mind spending some time in there!


Can someone please clue me in as to where to find appliances this color? I like to consider myself a treasure hunter of sorts and I can't find this crap anywhere!


Peanut Butter Patties

INGREDIENTS
1⁄2 cup butter
3⁄4 cup peanut butter
3⁄4 cup graham cracker crumbs (you can find these in the baking aisle)
1⁄4 cup maple sugar or other granulated sweetener
1 cup chocolate or carob chips (I like to use dark chocolate)
1⁄4 cup milk

STEPS
1) Line a 12-cup muffin tin with paper liners and set aside.
2)Melt the butter in a small saucepan over medium heat. Stir in the peanut butter, graham cracker crumbs, and maple sugar and mix well. Remove the mixture from the heat.
3)Evenly divide the mixture, approximately 2 tablespoons per cup, among the muffin cups. Place in the fridge for about 30 minutes.
4)Combine the chocolate and milk in another pan. Stir over medium heat until the chocolate has melted. (Be patient and do this slowly over a medium to low hear depending on your stove top. You do not want to burn this!)
5)Spoon the chocolate evenly over the peanut butter mixture.
6)Place in the refrigerator to set for at least 2 hours before serving.

This is one of my favorite things to make. No oven needed and they are so much better than Reese's. I like to make them using the mini muffin tins. These babies are rich and the smaller size is just right. You may be so inclined to sprinkle some chopped nuts on the top (even though I think nuts are horrible, but hey it's up to you!) Keep them refrigerated and they will hold for a few days.

Enjoy!